Category Archives: how to

[Puppet] fixing mod_passenger: Cannot connect to Unix socket – Permission denied in a hardened AWS Linux 2014.09

As I’ve shared in my previous post, I was working on hardening AWS Linux 2014.09 using Puppet. I got that finished and I’ll probably improve the class in the future to make it easier to manage.

The first thing you’ll realize when you harden a system is this: it will break stuff… No, I’m not talking about the small stuffs, I’m talking about major applications that you rely on.

The first to break that I noticed was running a Puppet master with httpd + mod_passenger in AWS Linux 2014.09. It won’t work properly anymore… Ugh!

Since I was in hurry when I first discovered this, I just reverted back to the default Puppet master using Ruby webrick. Performance was really not an issue since this is only for our environment where we write/test our Puppet classes…

But when I decided to separate the CA server of our Puppet master for scalability — I can’t use the default Ruby webrick anymore. I have to allot the time and investigate if what’s the root cause of the problem

passenger error

snapshot of the error

Clearly… it has something to do with permissions. The web server (httpd) cannot access the Unix socket created by mod_passenger.

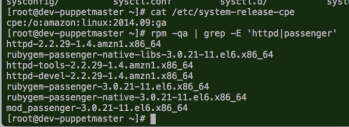
versions

version information

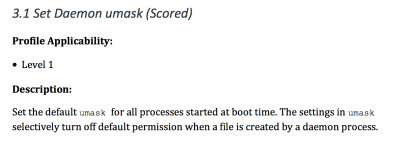
Reviewing the CIS guidelines for AWS Linux 2014.09 pointed me to “3.1 Set Daemon umask” which states:

CIS 3.1

This is enforced by this Puppet class via this sysconfig configuration. CIS 3.1 guideline clearly says that “The daemon process can manually override these settings if these files need additional permission.”  — which gave me an idea to override this in the httpd level.

So… override we go…

I opened /etc/init.d/httpd in vim and added a less strict umask: umask 0022

httpd

Restarted httpd and then… FIXED! 🙂

[HowTo] AWS Route 53 domain failover to a static site hosted in S3

We have this big website that’s currently being overhauled (means: new architecture, new tech stack and totally new code from the ground up). The lead dev asked our team if we can redirect traffic to a static site in case the actual site is down.

[Update: Our site is now launched! It’s still in beta. Check it out here: https://new.smartnet.ph]

I only overheard this but I jumped in to help because I’ve been wanting to try this feature of Route 53 but didn’t have the chance to really implement it.

I figured that that there should be a lot of tutorials on how to do this already… so this should be a walk in the park.

A little help from Google lead me to a few sites. This one is a good tutorial if you only want to redirect to different IP (steps are listed and screenshots!).

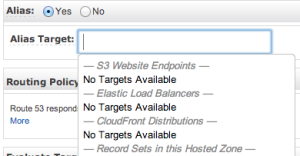
I didn’t find a good tutorial as far as aliases are involved. And we’re stuck with this loading screen:

Screen Shot 2014-08-19 at 8.10.57 AM

Not really a walk in the park…

With that good tutorial  as reference, we (with help from John) decided to have a crack at this ourselves.

Note: This guide assumes that your domain is already hosted in Route 53, if not you must move it first.

This how we did it:

  1. create a static site hosted in S3 [how?] – skip Step 3
  2. create your route 53 health checks [how?] – replace Step 8 with the steps below

Create a secondary alias failover using AWS CLI:

  • get the Hosted zone ID of your S3 endpoint [here] – In our case we’re using Singapore so hosted id is Z3O0J2DXBE1FTB
  • get the Hosted zone ID of your domain [how?] – in this guide, let’s assume that mysite.ph has a zone id of ABCDE12345
  • create a json file like below:
  • serenity:~ deadlockprocess$ cat ~/tmp/mysite.ph.json
    {
      "Comment": "mysite.ph failover",
      "Changes": [
        {
          "Action": "CREATE",
          "ResourceRecordSet": {
            "Name": "mysite.ph",
            "Type": "A",
            "SetIdentifier": "mysite.ph-secondary",
            "Failover": "SECONDARY",
            "AliasTarget": {
              "HostedZoneId": "Z3O0J2DXBE1FTB",
              "DNSName": "s3-website-ap-southeast-1.amazonaws.com",
              "EvaluateTargetHealth": false
            }
          }
        }
      ]
    }
  • add the failover alias as a new record set in Route 53 with this command:
  • serenity:~ deadlockprocess$ aws route53 change-resource-record-sets --hosted-zone-id ABCDE12345 --change-batch file:///Users/deadlockprocess/tmp/mysite.ph.json
  • you can now go back to this guide and do Step 9 onwards
  • also, allow the Route 53 Health Checkers’ IPs in your firewall/security group

References:

HW: Upgrading the workhorse from 4GB to 16GB – Macbook Pro 2012

It’s really been a while since my last post. A lot has changed since then. I have been thinking on how can I start writing again for a while. I decided to start with something light.

I was assigned with a stock MBP 2012 in my new job. Core i5, 4GB… blah blah.. just stock specs. It was OK for a while but I started hitting the 4GB ceiling when I started playing around with VMs or if I’m processing 19k+ photos in Aperture.

Things just got sloooowww…. It’s a no brainer that I really need to add more RAM. Lots of it.

So I started checking online if where can I buy RAM with best bang-for-the-buck. I paid a visit to that trusty TipidPC site. I decided to get this item. It’s a Crucial 16GB (8×2) CT2K8G3S160BM memory sticks. I managed to buy it yesterday for 4,400PHP (109USD). And after a series of meetings at work, I finally got it installed last night when I got home.

This is how it went…

First, I checked for a good tutorial, iFixit has a good step-by-step guide here.

I removed the back panel as indicated in the guide…
IMG_6261

Then I disconnected the battery. I had to do this slowly, wiggling it side to side (slowly) until it got loose.
IMG_6262

When I checked the memory (Samsung M471B5773DH0-CK0), I was surprised to see a “Made in the Philippines” sticker 🙂
IMG_6263

Removing the top RAM module is easy. Removing the second one will require some finesse and a little patience.
IMG_6265

Now that the “old” modules are out, I replaced it with the “new” ones.
IMG_6266

Time to close it and cross fingers when I press the power button.
IMG_6267

So I guess it worked!
IMG_6269

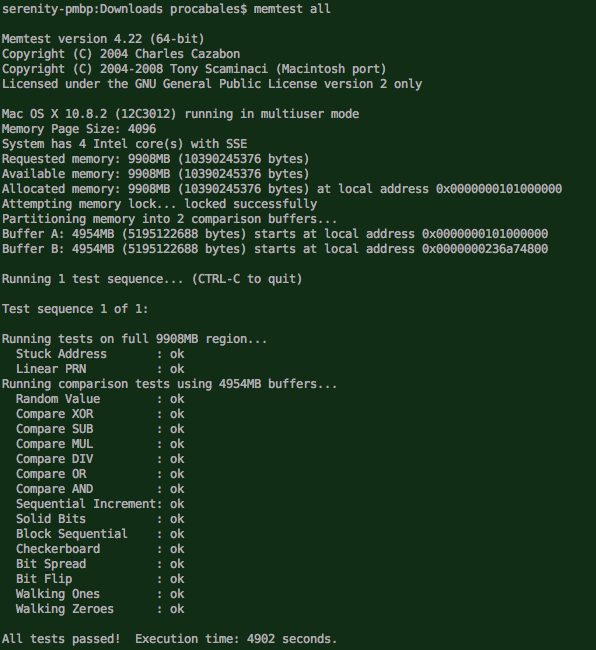
Just to be sure I ram memtest for Mac OS X as well. I used this site as reference. After running memtest, no red flags were raised. That’s good! 🙂

Screen Shot 2013-03-13 at 8.27.53 PM

References:

rsyncd won’t bind problem, determine what pid uses a port

We had a problem with one of our server. It’s rsyncd is not responding anymore. It’s listening to the port but it’s not accepting requests.

Here’s what the log says:

[root@SERVER ~]# tail /var/log/messages
Jun 21 13:19:46 SERVER xinetd[28270]: Swapping defaults
Jun 21 13:19:46 SERVER xinetd[28270]: readjusting service amanda
Jun 21 13:19:46 SERVER xinetd[28270]: bind failed (Address already in use (errno = 98)). service = rsync
Jun 21 13:19:46 SERVER xinetd[28270]: Service rsync failed to start and is deactivated.
Jun 21 13:19:46 SERVER xinetd[28270]: Reconfigured: new=0 old=1 dropped=0 (services)
Jun 21 13:21:34 SERVER xinetd[28270]: Exiting...
Jun 21 13:22:09 SERVER xinetd[32476]: bind failed (Address already in use (errno = 98)). service = rsync
Jun 21 13:22:09 SERVER xinetd[32476]: Service rsync failed to start and is deactivated.
Jun 21 13:22:09 SERVER xinetd[32476]: xinetd Version 2.3.14 started with libwrap loadavg labeled-networking options compiled in.
Jun 21 13:22:09 SERVER xinetd[32476]: Started working: 1 available service

We tried stopping xinetd but there is still a process bound to the 873 port:

[root@SERVER ~]# service xinetd stop
Stopping xinetd: [ OK ]
[root@SERVER ~]# telnet localhost 873
Trying 127.0.0.1...
Connected to localhost.localdomain (127.0.0.1).
Escape character is '^]'.
^]
telnet> quit
Connection closed.

If only we could determine what process is still bound to the 873 port…

Well, there’s an app for that: lsof -i tcp:<port>

[root@SERVER ~]# lsof -i tcp:873
COMMAND PID USER FD TYPE DEVICE SIZE NODE NAME
rpc.statd 1963 rpcuser 7u IPv4 4798 TCP *:rsync (LISTEN)
[root@SERVER ~]# kill 1963
[root@SERVER ~]# kill 1963
-bash: kill: (1963) - No such process
[root@SERVER ~]# telnet localhost 873
Trying 127.0.0.1...
telnet: connect to address 127.0.0.1: Connection refused
telnet: Unable to connect to remote host: Connection refused

Now that the process is dead, we restarted xinetd…

[root@SERVER ~]# service xinetd start
Starting xinetd: [ OK ]
[root@SERVER ~]# tail /var/log/messages
Jun 21 13:21:34 SERVER xinetd[28270]: Exiting...
Jun 21 13:22:09 SERVER xinetd[32476]: bind failed (Address already in use (errno = 98)). service = rsync
Jun 21 13:22:09 SERVER xinetd[32476]: Service rsync failed to start and is deactivated.
Jun 21 13:22:09 SERVER xinetd[32476]: xinetd Version 2.3.14 started with libwrap loadavg labeled-networking options compiled in.
Jun 21 13:22:09 SERVER xinetd[32476]: Started working: 1 available service
Jun 21 13:23:06 SERVER xinetd[32476]: Exiting...
Jun 21 13:25:18 SERVER rpc.statd[1963]: Caught signal 15, un-registering and exiting.
Jun 21 13:25:18 SERVER portmap[3556]: connect from 127.0.0.1 to unset(status): request from unprivileged port
Jun 21 13:25:31 SERVER xinetd[3912]: xinetd Version 2.3.14 started with libwrap loadavg labeled-networking options compiled in.
Jun 21 13:25:31 SERVER xinetd[3912]: Started working: 2 available services

… and that solves the problem. 🙂

References:

Install a MySQL NDB Cluster using CentOS 6.2 with 2 MGMs/MySQL servers and 2 NDB nodes

I wrote a post few weeks back that my MySQL NDB cluster was already running. This is a follow-up post on how I did it.

Before I dug in, I read some articles first on the best practices for MySQL Cluster installations. One of the sources that I’ve read is this quite helpful presentation.

The plan was to setup the cluster with 6 components:

  • 2 Management nodes
  • 2 MySQL nodes
  • 2 NDB nodes

Based on the best practices, I only need 4 servers to accomplish this setup. With these tips in mind, this is the plan that I came up with:

  • 2 VMs (2 CPUs, 4GB RAM, 20GB drives ) – will serve as MGM nodes and MySQL servers
  • 2 Supermicro 1Us (4-core, 8GB RAM, RAID 5 of 4 140GB 10k rpm SAS) – will serve as NDB nodes
  • all servers will be installed with a minimal installation of CentOS 6.2
The servers will use these IP configuration
  • mm0 – 192.168.1.162 (MGM + MySQL)
  • mm1 – 192.168.1.211 (MGM + MySQL)
  • lbindb1 – 192.168.1.164 (NDB node)
  • lbindb2 – 192.168.1.163 (NDB node)

That’s the plan, now to execute…

I downloaded the binary packages from this mirror. If you want a different mirror, you can choose from the main download page. I only need these two:

To install the packages, I ran these commands in the respective servers

    mm0> rpm -Uhv --force MySQL-Cluster-server-gpl-7.2.5-1.el6.x86_64.rpm
    mm0> mkdir /var/lib/mysql-cluster
    mm1> rpm -Uhv --force MySQL-Cluster-server-gpl-7.2.5-1.el6.x86_64.rpm
    mm1> mkdir /var/lib/mysql-cluster
    lbindb1> rpm -Uhv --force MySQL-Cluster-server-gpl-7.2.5-1.el6.x86_64.rpm
    lbindb1> mkdir -p /var/lib/mysql-cluster/data
    lbindb2> rpm -Uhv --force MySQL-Cluster-server-gpl-7.2.5-1.el6.x86_64.rpm
    lbindb2> mkdir -p /var/lib/mysql-cluster/data

The mkdir commands will make sense in a bit…

My cluster uses these two configuration files:

  • /etc/my.cnf  – used in the NDB nodes and MySQL servers (both mm[01] and lbindb[01])
  • /var/lib/mysql-cluster/config.ini – used in the MGM nodes only (mm[01])

Contents of /etc/my.cnf:

[mysqld]
# Options for mysqld process:
ndbcluster # run NDB storage engine
ndb-connectstring=192.168.1.162,192.168.1.211 # location of management server

[mysql_cluster]
# Options for ndbd process:
ndb-connectstring=192.168.1.162,192.168.1.211 # location of management server

Contents of /var/lib/mysql-cluster/config.ini:

[ndbd default]
# Options affecting ndbd processes on all data nodes:
NoOfReplicas=2 # Setting this to 1 for now, 3 ndb nodes
DataMemory=1024M # How much memory to allocate for data storage
IndexMemory=512M
DiskPageBufferMemory=1048M
SharedGlobalMemory=384M
MaxNoOfExecutionThreads=4
RedoBuffer=32M
FragmentLogFileSize=256M
NoOfFragmentLogFiles=6

[ndb_mgmd]
# Management process options:
NodeId=1
HostName=192.168.1.162 # Hostname or IP address of MGM node
DataDir=/var/lib/mysql-cluster # Directory for MGM node log files

[ndb_mgmd]
# Management process options:
NodeId=2
HostName=192.168.1.211 # Hostname or IP address of MGM node
DataDir=/var/lib/mysql-cluster # Directory for MGM node log files

[ndbd]
# lbindb1
HostName=192.168.1.164 # Hostname or IP address
DataDir=/var/lib/mysql-cluster/data # Directory for this data node's data files

[ndbd]
# lbindb2
HostName=192.168.1.163 # Hostname or IP address
DataDir=/var/lib/mysql-cluster/data # Directory for this data node's data files

# SQL nodes
[mysqld]
HostName=192.168.1.162

[mysqld]
HostName=192.168.1.211

Once the configuration files are in place, I started the cluster with these commands (NOTE: Make sure that the firewall was properly configured first):

mm0> ndb_mgmd --ndb-nodeid=1 -f /var/lib/mysql-cluster/config.ini
mm0> service mysql start
mm1> ndb_mgmd --ndb-nodeid=2 -f /var/lib/mysql-cluster/config.ini
mm1> service mysql start
lbindb1> ndbmtd
lbindb2> ndbmtd

To verify if my cluster is really running, I logged-in into one of the MGM nodes and ran ndb_mgm like this:
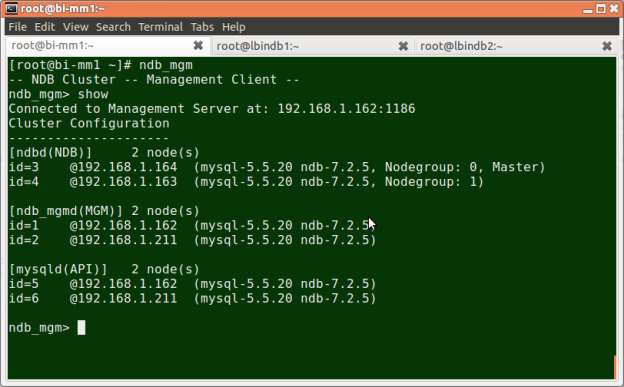
I was able to set it this up a few weeks back. Unfortunately, I haven’t had the chance to really test it with our ETL scripts… I was occupied with other responsibilities…

Thinking about it now, I may have to scrap the whole cluster and install a MySQL with InnoDB + lots of RAM! hmmm… Maybe I’ll benchmark it first…

Oh well… 🙂

References: