Category Archives: centos/rhel

Install a MySQL NDB Cluster using CentOS 6.2 with 2 MGMs/MySQL servers and 2 NDB nodes

I wrote a post few weeks back that my MySQL NDB cluster was already running. This is a follow-up post on how I did it.

Before I dug in, I read some articles first on the best practices for MySQL Cluster installations. One of the sources that I’ve read is this quite helpful presentation.

The plan was to setup the cluster with 6 components:

  • 2 Management nodes
  • 2 MySQL nodes
  • 2 NDB nodes

Based on the best practices, I only need 4 servers to accomplish this setup. With these tips in mind, this is the plan that I came up with:

  • 2 VMs (2 CPUs, 4GB RAM, 20GB drives ) – will serve as MGM nodes and MySQL servers
  • 2 Supermicro 1Us (4-core, 8GB RAM, RAID 5 of 4 140GB 10k rpm SAS) – will serve as NDB nodes
  • all servers will be installed with a minimal installation of CentOS 6.2
The servers will use these IP configuration
  • mm0 – 192.168.1.162 (MGM + MySQL)
  • mm1 – 192.168.1.211 (MGM + MySQL)
  • lbindb1 – 192.168.1.164 (NDB node)
  • lbindb2 – 192.168.1.163 (NDB node)

That’s the plan, now to execute…

I downloaded the binary packages from this mirror. If you want a different mirror, you can choose from the main download page. I only need these two:

To install the packages, I ran these commands in the respective servers

    mm0> rpm -Uhv --force MySQL-Cluster-server-gpl-7.2.5-1.el6.x86_64.rpm
    mm0> mkdir /var/lib/mysql-cluster
    mm1> rpm -Uhv --force MySQL-Cluster-server-gpl-7.2.5-1.el6.x86_64.rpm
    mm1> mkdir /var/lib/mysql-cluster
    lbindb1> rpm -Uhv --force MySQL-Cluster-server-gpl-7.2.5-1.el6.x86_64.rpm
    lbindb1> mkdir -p /var/lib/mysql-cluster/data
    lbindb2> rpm -Uhv --force MySQL-Cluster-server-gpl-7.2.5-1.el6.x86_64.rpm
    lbindb2> mkdir -p /var/lib/mysql-cluster/data

The mkdir commands will make sense in a bit…

My cluster uses these two configuration files:

  • /etc/my.cnf  – used in the NDB nodes and MySQL servers (both mm[01] and lbindb[01])
  • /var/lib/mysql-cluster/config.ini – used in the MGM nodes only (mm[01])

Contents of /etc/my.cnf:

[mysqld]
# Options for mysqld process:
ndbcluster # run NDB storage engine
ndb-connectstring=192.168.1.162,192.168.1.211 # location of management server

[mysql_cluster]
# Options for ndbd process:
ndb-connectstring=192.168.1.162,192.168.1.211 # location of management server

Contents of /var/lib/mysql-cluster/config.ini:

[ndbd default]
# Options affecting ndbd processes on all data nodes:
NoOfReplicas=2 # Setting this to 1 for now, 3 ndb nodes
DataMemory=1024M # How much memory to allocate for data storage
IndexMemory=512M
DiskPageBufferMemory=1048M
SharedGlobalMemory=384M
MaxNoOfExecutionThreads=4
RedoBuffer=32M
FragmentLogFileSize=256M
NoOfFragmentLogFiles=6

[ndb_mgmd]
# Management process options:
NodeId=1
HostName=192.168.1.162 # Hostname or IP address of MGM node
DataDir=/var/lib/mysql-cluster # Directory for MGM node log files

[ndb_mgmd]
# Management process options:
NodeId=2
HostName=192.168.1.211 # Hostname or IP address of MGM node
DataDir=/var/lib/mysql-cluster # Directory for MGM node log files

[ndbd]
# lbindb1
HostName=192.168.1.164 # Hostname or IP address
DataDir=/var/lib/mysql-cluster/data # Directory for this data node's data files

[ndbd]
# lbindb2
HostName=192.168.1.163 # Hostname or IP address
DataDir=/var/lib/mysql-cluster/data # Directory for this data node's data files

# SQL nodes
[mysqld]
HostName=192.168.1.162

[mysqld]
HostName=192.168.1.211

Once the configuration files are in place, I started the cluster with these commands (NOTE: Make sure that the firewall was properly configured first):

mm0> ndb_mgmd --ndb-nodeid=1 -f /var/lib/mysql-cluster/config.ini
mm0> service mysql start
mm1> ndb_mgmd --ndb-nodeid=2 -f /var/lib/mysql-cluster/config.ini
mm1> service mysql start
lbindb1> ndbmtd
lbindb2> ndbmtd

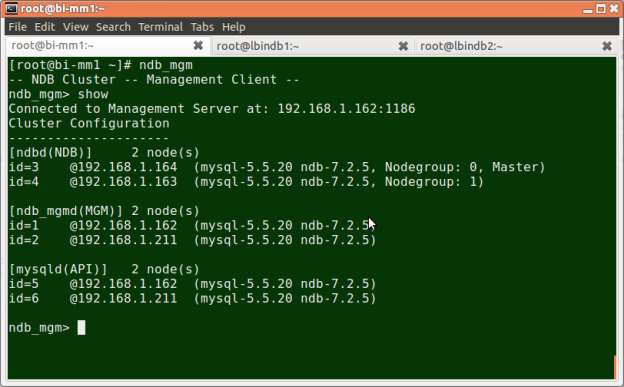
To verify if my cluster is really running, I logged-in into one of the MGM nodes and ran ndb_mgm like this:

I was able to set it this up a few weeks back. Unfortunately, I haven’t had the chance to really test it with our ETL scripts… I was occupied with other responsibilities…

Thinking about it now, I may have to scrap the whole cluster and install a MySQL with InnoDB + lots of RAM! hmmm… Maybe I’ll benchmark it first…

Oh well… 🙂

References:

How to setup large partitions (>2TB RAID arrays) in CentOS 6.2 with a Supermicro Blade SBI-7125W-S6

We’re on the process of retiring our non-blade servers to free up space and reduce power usage. This move affects our 1U backups servers so we have to migrate it to blades as well.

I was setting-up a blade server as a replacement for one of our backup servers when I encountered a problem…

But before I get into that, here’s the specs of the blade:

  • Supermicro Blade SBI-7125W-S6 (circa 2008)
  • Intel Xeon E5405
  • 8 GB DDR2
  • LSI RAID 1078
  • 6 x 750 GB Seagate Momentus XT (ST750LX003)

The original plan was to set-up these drives as a RAID 5 array, about 3.5+ TB in size. The RAID controller can handle the size. So Rich, my colleague who did the initial setup of  the blade & the hard drives, did not encounter a problem.

I was cruising through the remote installation process until I hit a snag in the disk partitioning stage. The installer won’t use the entire space of the RAID array. It will only create partition(s) as long as the total size is 2TB.

I find it unusual because I’ve created bigger arrays before using software RAID and this problem did not manifest. After a little googling I found out that it has something to do with the limitations of Master Boot Record (or MBR). The solution is to use the GUID partition table (or GPT) as advised by this discussion.

I have two options at this point,

  1. go as originally planned, use GPT, and hope that the SBI-7125W-S6 can boot with it, or…
  2. create 2 arrays, one small (that will use MBR so the server can boot) and one large (that will use GPT  so that the disk space can be used in its entirety)

I tried option #1, it failed. The blade won’t boot at all. Primarily because the server has a BIOS, not an EFI.

And so I’m left with option #2…

The server has six drives. To implement option #2, my plan was to create this setup:

  • 2 drives at RAID 1 – will become /dev/sda, MBR, 750GB, main system drive (/)
  • 4 drives at RAID5 – will become /dev/sdb, GPT, 2.x+TB, will be mounted later

The LSI RAID 1078 can support this kind of setup, so I’m in luck. I decided to use RAID 1 & RAID 5 because redundancy is the primary concern, size is secondary.

This is where IPMI shines, I can reconfigure the RAID array remotely using the KVM console of IPMIView like I’m physically there at the data center 🙂 With the KVM access, I created 2 disk groups using the Web BIOS of the RAID controller.

Now that the arrays are up, I went through the CentOS 6 installation process again. The installer detected the 2 arrays, so no problem there. I configured /dev/sda with 3 partitions and  left /dev/sdb unconfigured (it can be configured easily later once CentOS is up).

In case you’re wondering, I added a 3.8GB LVM PV since this server will become a node of our ganeti cluster, to store VM snapshots.

The CentOS installation booted successfully this time. Now that the system’s working, it’s time to configure /dev/sdb.

I installed the EPEL repo first, then parted:

$ wget -c http://download.fedoraproject.org/pub/epel/6/i386/epel-release-6-6.noarch.rpm 
$ wget -c https://fedoraproject.org/static/0608B895.txt 
$ rpm -Uvh epel-release-6-5.noarch.rpm 
$ rpm --import 0608B895.txt 
$ yum install parted

Then, I configured /dev/sdb to use GPT, then formatted the whole partition as ext4:

$ parted /dev/sdb mklabel gpt 
$ parted /dev/sdb 
(parted) mkpart primary ext4 1 -1 
(parted) quit 
$ mkfs.ext4 -L data /dev/sdb

To mount the /dev/sdb, I need to find out its UUID first:

$ ls -lh /dev/disk/by-uuid/ | grep sdb 
lrwxrwxrwx. 1 root root 9 May 12 15:07 858844c3-6fd8-47e9-90a4-0d10c0914eb5 -> ../../sdb

Once I have the right UUID, I added this line in /etc/fstab. /dev/sdb will be mounted in /home/backup/log-dump/:

UUID=858844c3-6fd8-47e9-90a4-0d10c0914eb5 /home/backup/log-dump ext4 noatime,defaults 1 1

The partition is now ready to be mounted and used:

$ useradd backup
$ mkdir -p /home/backup/log-dump
$ mount /home/backup/log-dump
$ chown backup.backup -R /home/backup/log-dump

There, another problem solved. Thanks to the internet and the Linux community 🙂

After a few of days of copying files to this new array, this is what it looks like now:

/dev/sdb is almost used up already 🙂

References:

OK.. my MySQL NDB Cluster is up… now what?

I’ve been working on how to deploy our cluster for the past 2 days already. It’s nice to see that it’s running now given that I’ve been reading the MySQL manual for 2 days now…


I’ll create a detailed post on how I did it when I have more time.

Here are my preliminary notes so far:

  • only 2 files are needed, MySQL-Cluster-client-gpl-7.2.5-1.el6.x86_64.rpm & MySQL-Cluster-server-gpl-7.2.5-1.el6.x86_64.rpm
  • --force is required to install the server package in CentOS 6.2
  • make sure that IPs are static and firewalls are setup
  • total ndb nodes must be multiples of NoOfReplicas (1 or 2)
  • if mgm > 1, all mgms must be up first before you can issue commands (use –nowait-nodes to override)
  • for ndb nodes, ensure that the DataDir exists

I’m just savoring the fruits of my labor… for this is only the beginning… *sigh*

How to configure a virtualized Munin server to monitor 100+ servers in CentOS/RHEL

We use Munin primarily to gather historical data. The data  in turn is used for capacity planning, (e.g. server upgrades). The graphs are a good tool also to determine unusual server behavior (eg. spikes in memory, cpu usage, etc. ). We use it also as indicators or pointers to what caused a server crash.

Since we consolidated our servers and migrated it to virtualized ones, our Munin server was also affected. When we virtualized our Munin server, the first few days was a disaster. It simply can’t handle the load because the disk I/O required is too great!

To determine what part we can tweak to improve performance, it’s important to take a look how Munin generates those lovely graphs first. The Munin server process has four steps:

  1. munin-update -> updates the RRD files, if you have a lot of nodes, the disk I/O will be hammered!
  2. munin-limits
  3. munin-graph -> generates graphs out of the RDD files, multiple CPU cores is a must!
  4. munin-html
We only need to tweak steps #1 and #3 to increase its performance. But before I go with the details, here’s the specs of our Munin server:
  • OS: CentOS 6.2 x86_64
  • CPU: 4 cores
  • RAM: 3.5GB
  • HDD: 10GB
  • Munin: version 1.4.6

Note: Add the EPEL repository to install Munin 1.4.6 using yum.

Yup. I need that much RAM to address #1. Since it’s way cheaper to buy more memory than buying an SSD or an array of 10k/15k RPM drives, I used tmpfs to solve the disk I/O problem. This will make all RRD updates done in memory. This is not a new idea, this approach has been used for years already.

I added these lines in /etc/fstab:

# tmpfs for munin files
/var/lib/munin /var/lib/munin tmpfs size=1280M,nr_inodes=1m,mode=775,uid=munin,gid=munin,noatime 0 0
/var/www/munin /var/www/munin tmpfs size=768M,nr_inodes=1m,mode=775,uid=munin,gid=munin,noatime 0 0

 And this is how it looks like in production once mounted and in use:

[root@munin ~]# df -h
Filesystem Size Used Avail Use% Mounted on
/dev/vda1 9.6G 6.3G 3.0G 69% /
tmpfs 1.8G 0 1.8G 0% /dev/shm
/var/lib/munin 1.3G 937M 344M 74% /var/lib/munin
/var/www/munin 768M 510M 259M 67% /var/www/munin

Since all RRD files are now stored in RAM, these files will simply disappear to oblivion if the server was rebooted for any reason. To compensate, I added these maintenance scripts in root’s cron:

[root@munin ~]# crontab -l
# create RRD files backup
*/15 * * * * mkdir -p $HOME/munin-files/munin-lib/ &&  rsync --archive /var/lib/munin/* $HOME/munin-files/munin-lib/ > /dev/null 2>&1

# restore RRD files at reboot
@reboot mkdir -p /var/www/munin/ /var/lib/munin/ && chown -R munin.munin /var/www/munin/ /var/lib/munin/ && cp -a -r $HOME/munin-files/munin-lib/* /var/lib/munin/

# cleanup: remove inactive rrd and png files
@daily find /var/lib/munin/ -type f -mtime +7 -name '*.rrd' | xargs rm -f
@daily find $HOME/munin-files/munin-lib/ -type f -mtime +7 -name '*.rrd' | xargs rm -f
@daily find /var/www/munin/ -type f -mtime +7 -name '*.png' | xargs rm -f

What it does are:

  1. creates a backup of the RRD files every 15 minutes
  2. restores the RRD files from #1 in case the server was rebooted/crashed
  3. deletes inactive RRD and PNG (graphs) files to reduce tmpfs usage
As of date, our Munin server is currently monitoring 131 servers which equates to 18,000+ RRD files, and disk I/O is not an issue during munin-update, thanks to tmpfs.

[root@munin ~]# pcregrep '^\s*\[' /etc/munin/munin.conf | wc -l
131
[root@munin ~]# find /var/lib/munin/ -type f -name '*.rrd' | wc -l
18635

This is the typical cpu usage of our munin server for a day, iowait is neglible.

As for #3, the munin-graph step, this simply requires pure brute CPU computation power, multiple cores and some configuration tweaks. As reflected in the CPU graph above, I allotted 4 cores for our Munin server and about 75% of that is constantly in use. The KVM hypervisor of our Munin server has a Xeon E5504, not really the best there is but it gets the job done.

Since I allotted 4 cores for the Munin server VM, I set max_graph_jobs to 4:

[root@munin ~]# grep max_graph_jobs /etc/munin/munin.conf
# max_graph_jobs.
max_graph_jobs 4

Note: munin-graph was one process only in older versions of Munin. I recommend you use the 1.4.6 version.

Test your configurations, see how it behaves. You have to calibrate this value depending on what your CPU is and how many core it has (e.g if you have a Xeon X56xx, 4 cores may be an overkill).

This graph contains enough information to check what steps of the munin server you need to tweak…

As reflected in the graph above the munin-graph took about 200 secs maximum to finish. If this value goes beyond 300 (Munin’s master process runs every 5 minutes) , I may have to add a core and change max_graph_jobs to 5, or move the VM to a better hypervisor, else the graphs will be 5+ mins late or filled with gaps.

That’s it. This is how I managed our Munin server to monitor 100+ servers. Of course this only applies to Munin 1.4.x, I read that Munin 2.0 will be a lot different. Hopefully, Munin 2.0 can support hundreds of nodes out of the box, no tweaking needed… I guess we’ll see… 🙂

a poke on SSD write endurance, Intel SSD 320 and iostat

The decision to move  to virtualization-using-KVM as our standard way of deploying servers  was really a success, given the cost savings for the past 2 years. The only downside is the performance hit in intensive disk IO workloads.

Some disk IO issues were already addressed in the application side (e.g. use cache, tmpfs, etc., smaller logs) but it’s apparent that if we want our deployment to be more “denser”, we have to find alternatives for our current storage back-end. Probably not a total replacement but more of a hybrid approach.

Solid State Drives is probably the the best option. It is cheaper compared against Storage Area Networks. I like the idea even more because it’s a simple drop-in replacement to our current SAS/SATA drives compared against maintaining additional hardware. Besides, my team does not have the luxury of “unlimited” budgets.

After a lengthy discussion with my MD, he approved to perform some tests first to see if SSD route is feasible for us. I chose to use 4 120GB Intel SSD 320s. The plan was to setup these 4 drives in a RAID 10 array and see if how how many virtual machines it can handle.

I chose Intel because it’s SSDs are more reliable among the brands in the market today. If performance is the primary requirement, I’d choose a SSD with a SandForce controller (maybe OCZ) but its not, its reliability.

The plan was to set-up a RAID  10 array of four 320s. But since our supplier can only provide us with 3 drives at the time we ordered, I decided to go with a RAID 0 array of 2 drives instead. I can’t wait for the 4th drive. (It turned out to be a good decision because the 4th drive arrived after 2 months!).

The Intel 320s write endurance, 160GB version, are rated at 15TB. My premise was, if we’re going to write 10GB of data per day, it will take almost 5 year to reach that limit. And in theory, if it’s configured in a striped RAID array, it will be a lot longer than 5 years.

It’s been over a month since I set-up the ganeti node with the SSD storage, so I decided to check and see its total writes.

The ganeti node has been running for 45 days. /dev/sda3 is the LVM volume configured for ganeti to use. The total blocks written is 5,811,473,792 at the rate of 1,468.85 blocks per second.  Since 1 block = 512 bytes, this translates to 2,975,474,581,504 bytes (2.9TB) at the rate of  752,051.2 bytes per second (752kB/s). The write rate translates to 64,977,223,680 bytes (64.5GB) of total writes per day! Uh oh…

64.5GB/day is remotely near from my premise of 10GB/day. At this rate, my RAID array will die in less than 2 years!

Uh oh indeed…

It turned out that 2 of the KVM instances that I assigned to this ganeti node are DB servers. We migrated it here a few weeks back to fix a high IO problem. A move that cost the Intel 320s a big percentage of its lifespan.

It seems that 64GB/per day is huge but apparently, it’s typical on our production servers. Here’s an iostat of one of our web servers:

I’m definitely NOT going to move this server to a SSD array anytime soon.

As a whole, the test ganeti node has been very helpful. I learned a few things that will be a big factor on what hardware we’re going to purchase.

Some points that my team must keep in mind if we’ll pursue the SSD route:

  • IO workload profiling is a must (must monitor this regularly as well)
  • leave write intensive VMs in HDD arrays or
  • consider Intel SSD 710 ??? (high write endurance = hefty price tag)

I didn’t leave our SSD array to die that fast of course. I migrated the DB servers to a different ganeti node and replaced it with some application servers.

It decreased the writes to 672.31 blocks/sec (344kB/s), more than half of its previous rate.

Eventually, the RAID array will die of course. For how long exactly, I don’t know, > 2 years? 🙂